10.25.2011

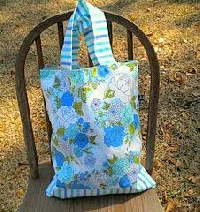
Vintage Sheet Tote Swap

Swap-bot swap: Vintage Sheet Tote
I swap with Swap-bot!

I started a vintage sheet tote swap on swap-bot today for those interested! Click on the link above to be directed to the swap.

Come, swap, enjoy yourself!!

10.22.2011

{Tutorial} : Half Moon Manicure (with glitter!)


I'm not one for usually polishing my tips. I usually go to a salon and get a manicure every other month, but looking at all the fun fall polishes in the stores have made me a tad ambitious and adventurous. I'm totally in love with the nudes and tawnies. I created this nail art earlier this week and decided I should share.

Materials:
- base coat/nail hardener
- base color
- accent color (Here I used a nail art polish with the super skinny brush in silver glitter. I suggest using something similar.)
- top coat


First remove any dirt, oil, etc, from your nail bed by washing your hands and rubbing nail with polish remover or alcohol. Apply base coat or nail hardener, whatever is your preference.


After base coat dries, apply 2 coats of your base color making sure each coat is dry before you layer the next one.


Take your accent color and draw a half moon shape across the width of your nail bed. This is why I suggest nail art brushes. They seem to be more flexible and less messy with drawing fluid, organic shapes.


Fill in the line you drew and let dry. When I polish my nails, I usually use the aid of a liquid nail dryer (because I'm very clumsy AND impatient!)


Apply your top coat and marvel at the prettiness you created!

I think this is a super fall manicure that looks wonderful for everyone. It brings just enough touch of uniqueness that will add a little pop to solid polishes.

10.19.2011

Vintage Pillowcase Laundry Bags


I have been working on some new laundry bags this week whenever I can find a little time before and after work. I've been going in early and staying late at work, so I haven't had much time to sit down and work on much of anything that's really involved. I did manage, however, to shoot a few of these bags. They are made from a pillowcase, some sheet scraps, and vintage zippers. I enjoy making these and watching to totally different fabrics come together and making something that is cohesive.


Thanks for browsing!!

Thrifting 10.17.11

I haven't been tbhrifting in a couple of weeks. I've really been trying to cut down on my times spent in thrift stores. Since I had been so good and disciplined as to keeping myself away from them, I allowed myself to wander into 2 on Monday. Am I ever glad I did!! I found a wonderful haul of sheets, I mean some that I have been drooling over on flickr and some I've never placed sight on. First I went to Salvation Army and noticed that their linens were half price that day. I was ecstatic!! I loaded up a cart full. Then I went to Harvest Thrift Store and grabbed a really great sheet and a couple pillowcases. I refrained from buying at least 3 more sheets. I was proud of myself.


These 2 are my favorite sheets of the trip and are now in my top likes. I had been wanting to find more colorful and floral sheets. By colorful I mean the sorts with brilliant whimisical backgrounds, not just white backgrounds with colorful flowers (although those are nice too). I think I did pretty well.


I've been wanting to find ones like these!


These two are the same. I like these because they have a falling daisies print on the front; the bulk of the daisies are at the base of the sheet.


I already own these sheets in yellow and blue.


I have 2 of these. I love stripes! It's sort of hard to tell, but this is aqua and purple.


The top pillowcases came with the sheets. I got the bottom cases because they had red in them.

What have you thrifted lately?

I Finally Did It!

I finally stopped being stuck in the Stone Ages and created to social site accounts! I just created a Pinterest and a Facebook page. I've added the buttons there to the right. Slowly but surely I'm coming around, ha! I just want to say that I'm in love with Pinterest!! It's magnificent. I'm going to be rearranging and adding more pages someday soon because it's sorting to look a bit messy around here. Anyway I need ideas for my fb page, so if anyone has any good advice; suggestions; and the like, please please feel free to douse me with your knowledge. I am a humble student anxious to learn. Also I want to follow people on both sites, so feel free to leave your links right down there in the old comments box!!

10.15.2011

Shop update

I put together a few fat quarter bundles this afternoon. They are all in delicious stripey-stripes. I've included a vintage button with each package.


There's Candy Striper (pink), Orange Slice, Lemonheads, and Crème de Menthe (green). I listed them in my etsy shop today.

Rainbow mini quilt


I made this back in the summer. I am not a quilter, and if I were one then I'm definitely not a quilter binder. I can piece and I can "get by" on quilting, but that binding stuff is not for me (at least not by machine).

I made this because I actually wanted to do a large vintage sheet rainbow quilt and because I had digitized some quilt blocks for my embroidery machine and wanted to try both out. Overall it was pretty simple, but I must remember to use more temporary adhesive spray.

This was a nice sample project to try and my daughter totally took it for her little dolls to play with. I must start designing a big one soon. I uploaded the quilt block embroidery designs to Sew Forum. If you need the links, just let me know and I'll post them.

10.14.2011

Bunting Pouches

Remember these wips? Well I finished them awhile ago and forgot to post photos of them.


They are made from vintage sheets and linen. They are fully lined, have an appliqued banner on the front and a coordinated back panel. They measure 3.5 inches by 3.5 inches, roughly.

I am listing them in the shop today.

10.11.2011

Sneak Peek

I'm working on incorporating more applique, vintage sheet scraps, and vintage buttons into my projects. This is a big step for me. As I've said before, I'm more of a functional sewists than doing things more aesthetically. Not saying I make things that are ugly, but I usually stick to very minimalistic designs when I create something. Anyway, enough chatter....


These little guys were fun to create, and I enjoyed sewing the vintage buttons into place. I can't wait to finish the project and post pictures.

Goodnight!

Mini beauty haul

I'm not normally fanatical about makeup or nail polish, but I had been dying to get to Ulta for some reason. I really wanted to look at some new polishes and was hoping that they had a sale. I found both! I got a bunch of nail polishes, some new lip color, and gold eyeshadow (not pictured). I also went to Bath & Body Works for a few new scents.


I already own a ton of polishes, but my collection mostly consists of pinks and corals. I'm not always in a coral mood, and I really wanted to try out the glorious nudes that have been coming out. I don't always like my nails painted but I thought that a nude would be just the right touch.

(Right to left: Ulta salon formula nail lacquer in Smoke Screen, Ulta in Set the Nude, Ulta in Sweet Nothing, and Essence Colour & Go in 34 Walk of Fame)


(Essence Walk of Fame on all but my ring finger. My fave shade right now!)


Keeping with the nude theme, I bought a nude gloss. It's Essence 04 Toffee Forever. It looks, feels, and smells divine! It is a wonderful overlay to the Ulta Sheer Pout lipstick I got as a free gift a little while back. They both feel wonderful.


I also purchased a new lipstick. It's NYX 513 Electra. I think it's a nice color. It goes along with my Ulta Extreme Wear lip stain in 10. The lipstick provides wonderful moisture to my continuously dry lips.

{Tutorial} : Leather bow necklace


I was playing around with some leather and vinyl over the weekend and came up with this semi-formal accessory. This is super easy to make and fun to rock.

You will need:

- scrap of leather (or vinyl)
- cutting tools (scissors, rotary cutter, etc)
- strong glue for leather or fabric
- eyelets or tapestry needle
- jump rings
- chain


Cut a piece of leather as wide and long as you want your bow to be. Mine was 3.5" by 5.5". You will also need a little piece that is about 1.5" by 0.5".


Pinch down the center. When you're satisfied with a bow, glue the centers down.


Glue the smaller piece around the center of your bow, making sure that the seam is in the back.


Punch holes in the corners for your eyelets. If you don't have eyelets, then use your needle to pierce holes in the corners.


Attach your eyelets if your using them.


Attach jump rings to the hole/eyelet.

Cut a length of chain that will fit loosely arond your neck. If you want, you can just attach your chain to the jumprings.


OR you can add embellishments before you add your chain. I added some freshwater pearls onto the jumprings before adding my chain.


Voila! Enjoy with your fave outfit!
10.05.2011

WIPs

I've been working on some new coin purses this week. I started on four; I'm trying to decide how many I want to make before I switch from the embroidery machine to the sewing machine.


I am backing each panel with a coordinating vintage sheet fabric. I think it'll add a little brightness to the neutral linen front panel. I'm making these with the appliques because I'm trying to go for things that are more aesthetically pleasing instead of just functional. They are going to be on the small side, about 4"x4".

I also have been making little tags from kraft paper cardstock.


I got the punch from Salvation Army for $2. I usually punch tags out of colorful scrapbook paper, but I wanted something a little more natural-looking. I think the effect is what I was going for.

I also printed some vintage inspired button cards onto the cardstock from Papercraft Inspirations. I plan on putting vintage buttons and vintage button earrings onto them as gifts and such.


It's a little difficult to see on that paper, so I think I'm going to use ivory paper instead. Thus far I like how it looks, though. Definitely the vintage feel I was trying to accomplish. Plus I just love the look of kraft paper. I think it provides a wonderful canvas or backdrop.